Showing posts with label HOUSE PROJECTS. Show all posts

October 22, 2013

Front Railing Reveal

That sounds way exciting.
 
It's a railing, and it looks good but I actually have already posted on instagram so technically this is not the official reveal. And it's just a railing.
 
I digress. Last time I left the blog we were at this point.
 
After weekends of being away and at weddings and seriously way too busy, J found one day to get up the side railing. He is a champ and worked all day and it went well.
 
Lesson #1 learned: If you buy the 6' rail at home depot, you actually get a railing that is approximately 5'7". It is labeled 6 feet. This is absolutely absurd. If you find the tiny print, it will say it is only 5'7" but the big bold writing on the front says otherwise. Splurge for the longer post if you need it because if you don't you'll have go to back to home depot many times.
 
Fast forward: A few weeks later we still had a lot to do so my parents came down. My mom and I handled all the baby playing and house cleaning while my dad and Jamie spent literally all day- breaksfast until dinner, after lots of coffee of course, completing the rest.
 
 
We had to rent a drill to get through the cement. And then after they made the progress on the left, had to undo it and we were back to the photo on the right because drilling through metal is also no fun.
 
 
A lot of this took place: staring at saw and railing and trying to decide exactly what angle to cut at in order to get the right outcome. There were also multiple cuts.  Unrelated, our nephew once said in pre school that a pencil was to put behind your ear because he saw J's dad do this so often. Cracks me up. At the end of the day, they figured it out.
 
 
When the bottom post was in well and they were struggling with the top post, they called in the very cute reserves. In her boots and northface fleece she was the best foreman they could ask for and I'm pretty sure with a little bit of Sienna around they figured it out.


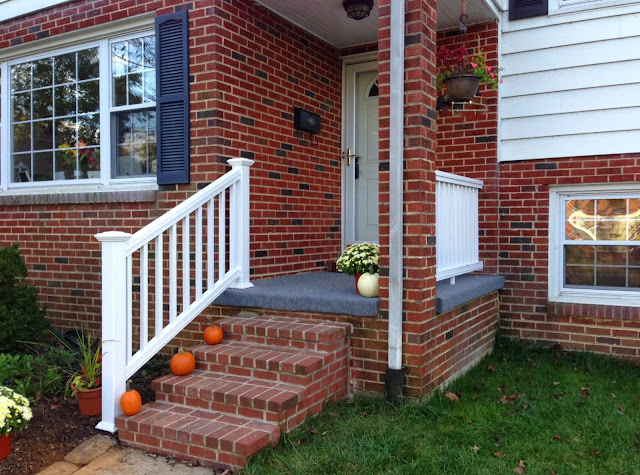
And this, here is the end product. I'm so ridiculously happy with this! It makes the entire house look different. As we think about where our next move will be, putting these finishing touches on the house really will pay off. Nothing like good curb appeal!


signaturemeghan

September 8, 2013

Front Porch Makeover: Phase One.

The other day I walked outside and the ugly starting to mold outdoor carpet on our front porch had pulled away from the cement. I had to rip some off immediately to keep from S falling. By the end of the day I was super annoyed that it was half falling off and just really an eye sore. So we decided to take on this project all at once- get rid of the old black metal railings, pull up the carpet, and replace it all with a new look. At the end it will have a nice white railing, a new coat of paint on the porch area, and some new (non molding) outdoor rug over it. With S running in and out, the outdoor rug provides a little extra padding when she inevitably tumbles out the front door onto it.

Here are some photos of our work thus far along the way. Still have a lot to do, but the eyesore is gone.


That was the starting  look. Can you see the mold on the side of the porch? The flowers help keep things looking okay, but it was getting really bad.


J got the entire carpet and railing off within an hour. A sawzall and ratchet did the trick on the railing. Oh, but here is one thing: do not use the sawzall while your wife is trying to put the baby down for a nap.  It will inevitably not go well.  Also note the nice chalk drawings on our stairs- pretty fancy, right?! So once it was stripped down we were left with chipping cement paint and uneven ground. And no railing.
 
 
A scraper got the chipping paint off- and then thick coat of new waterproof paint was applied which is what you see in that left photo. We knew we had to put some outdoor carpet back down, but waterproof painting should help with avoiding mold this time while leaving a soft(er) surface for the kiddo. Sienna is sitting on the outdoor carpet in that photo clapping and saying YAY as daddy worked.


 Up next? Putting in the post for the bottom of the new railings. This calls for a post hole digger. {Side note, if you're a parent of a toddler have you ever seen the dig-zacto episode of curious George? It's all I could think of the entire time we used this thing.} You have to dig a 2 foot deep hole to put the 4x4 in. Sienna was helping daddy carry a lighter piece of wood while he carried the level. You can see in that second picture above here there are two pieces of wood in the ground- the second smaller piece S was carrying is also in the ground- you nail a smaller piece across the two after you pour concrete into the hole for the 4x4 to keep it level. Oh and Sienna kept saying "Nenna peak!" to look into the concrete bucket since we said no hands in there. So cute.
 
Here's where we are now! J put the new carpet down. I didn't take photos because I was trying to prevent the little one from getting her feet in the glue. The post is in and setting. The carpet is down. Next up is building the railing and the side rail. But for now some major improvement around here.
 
I know we sort of took a house hiatus for awhile but... we're BACK. And there are quite a few projects on the docket now.  The finishing touches are officially on our list!
 
 
signaturemeghan
 
 
**Disclaimer: Sienna is dressed in unmatching pajamas playing outside because today she insisted on her mickey shirt for nap time and then refused to put back on real clothes when she woke up. Pick your battles, right?

January 29, 2013

Next Up: Kitchen Table

I've wanted a new kitchen table for awhile. Our was a hand me down, but worked just fine for awhile. Now it's harder to sit more than six people, four without the end chairsr. And the benches. They are good in theory, but NOT in real life.

So I am putting this out here to motivate us. We bought tools. We bought lumber. We are J is building a table. I will not pretend that I'll be a major part of this. I will cheer him on. I will pick out the stain color. Otherwise I don't think I'll be too involved. I'll be on S duty.

Here are some examples of what we are hoping to have this bad boy look like when it's all finished. We are still debating what finish, but are still looking around.


*images mostly taken from Ana White's wonderful website full of furniture plans.

Love all of these. I think I want to switch it up with the chairs. No matching dark wood. I want light chairs, maybe with a cool design on them. Here are some (of many) I've been eyeing up. Most are from Target! A few are from Home Decorators.


I am all over the place. But it's in the works. I can't wait to have a gorgeous new table to complete our refinished kitchen officially. Anyone have opinions on these chairs??
 
Finally back to renos and DIY projects...

May 6, 2012

To Do List

Having Sienna is awesome. BUT I end up not being productive on the weekends. I mean, would you? I spend from 7-8:30 am in bed with J and Sienna playing and feeding her and watching her smile. Then when she goes down for her nap I do too! Because we I am still only getting sporadicly a few hours of sleep around here. Sienna even sleeps through her own feedings. By the time she's up again at 10 or 10:30, I feed her and oh my goodness it's halfway through the weekend! I sort of wouldn't trade this time for the world though. She is happiest in the morning well rested and smiley.

That being said, we've got things to do. And OMG, January 20, one month before the little one arrived, was the last time I posted about house things. Since then though, we DID get actual lights installed in the kitchen and can now cook without squinting. Success. I'll post on that later.

But let's recap. Here was the list I had back in the day, but updated!

House & Baby Prep List

Kitchen

Finish last piece of tile

Grouting

Recessed Lighting

Light over sink

Choose paint for eating area

Paint eating area

Finish reno of china cabinet

New Cat Room

Clean out "storage" area

New FLOR carpet tiles

measure new door

frame new door

move cat things (beds, food bowls, litter)

create cat door into room

DIY Crafts & Baby Projects

Buy Anthro pulls

Change hardware on baby armoire to Anthro pulls

Buy second hand dresser

Renovate second hand dresser

DIY name project (secret even to me since we haven't picked a name yet)

Baby Room

Move all office furniture out of room & store

Clean, Clean, Clean!!! (well clean time #1)

Paint second coat of ligher yellow paint

Move in furniture (December/January delivery)

Hang chandelier & wire lighting

Clean out closet (dreading this) to make room for baby clothes

Hang Wall Decor
 
Ah I love the look of a nice well crossed off list. As you can see, the kitchen still lives on that last. And I want to add a chalkboard wall to the cat room area.
 
So my goal in the next month (stating this publicly may help me out here) by June 6, is to paint the eating area of the kitchen and the trim, and to hang up the wine racks we got for our wedding. yes, way overdue.
 
Let's hope I can stick to this. Sienna is up from her nap, off to play with my little one!

January 30, 2012

Let there be LIGHT.

Our kitchen is not actually finished, despite the fact that I act like it is and we use it on a regular basis. There are still things to do such as put in lighting, paint the ceiling, paint the eating area, and install a sliding door.

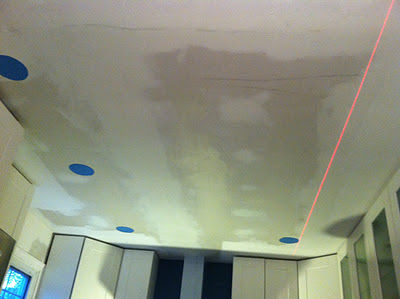
This weekend J's dad helped with the lighting. SO thankful for that because I was in no shape to do things like hold tools up to the ceiling or climb in the crawl space.  So first we had to figure out placement of lights. This sort of stuff drives me craaaazy.  Because I want it to be perfect but totally don't want to do the work. J cut out blue circles and we hung them up using the laser light level.


After much debating, they looked good and the drill with the circle blade came out. These are recessed lights, so holes need to be cut in the ceiling and then J needed to lower the lights in from the crawl space above. A little complicated, but nothing the Walls men couldn't handle.


Anddd it quickly failed. It kept moving across the ceiling. So a good old manual knife was used. And it was so succesful!


We had 6 recessed lights in the garage so we brought them in... and after more work than I could really show via pictures (okay fine I was folding baby laundry instead) the end result is this! All the lights are installed. The wiring still needs to be complete, but overall they look great! A little finishing of the ceiling paint and we'll have one more step of the kitchen complete.

One day this house will be done, one day.... At least it becomes more realistic every day.

PS I love this kitchen table and love the white chairs. We may have to get all of this pront, minus the big lights over the table because we aren't replacing our light fixture (for now anyway). Major love.

January 22, 2012

one, two, threeeee (said in the voice of the owl from the tootsie pop commercial)


Here are the three projects I we accomplished today. Numbers 1 and 2 are all me. Number 3 would not even be slightly functional without Jamie's expertise. Not too shabby for a Sunday.
Number 1:Decorative Hoops
 I've had this pinned since before I was pregnant possibly... or soon after. It was definitely in the early days. I clicked and found the blog it came from, with more details and cutie baby!It looked cute, cheap, and doable. Now, the only problem? Our baby has no name yet. I don't mean we know and aren't sharing... or that she's not here so we aren't jinxing anything. We just haven't decided! So with my project, I just cut a W out of paper and used it as a placeholder. After a quick trip to AC moore for fabric (I bought the "swatches for $1.99) and embroidery hoops- it was so super easy and fast!


Oh yeah, wait, I also "splurged" on the little fabric self-adhesive flowers. . I am hoping to do a few more with greys in them in the upcoming weeks. The really poorly cut out W makes this look sort of half-assed (and that part was), but I hung them up on the wall just to see what they'd generally look like and I love them!

 
Number 2: Refurbished Lamp!
The light. The stand up lamp in that room was a black rusty type color. I planned to just get rid of it, until something caught my eye at Home Depot, our second home lately. Rustoleum Paint & Primer in one. For ANY surface (at any angle apparently, though my 3 coats tell me that is not so).

But it definitely works... and $7 for paint is better than $150 for a new white lamp. So I did my best.

Oh wow, messy garage. That is because there are 500 boxes from baby stuff in there. Let me give you a closer look at the white version- it's glossy and pretty!
 And here is the finished product i the room sitting with the rest of the furniture!


Number 3: CHANDELIER!!! Baby Pottery Barn Chandelier! It's finished!!!
I'd like to expain to you how this occured, but all I've got are a few photos and a lot of happiness. J and his friend Jeff wired the chandelier appropriately from another power sources in the room, climbed in the attic, and ran the electric to the ceiling where the chandlier needed to be hung. One downside is a big hole had to be made in the wall, but don't worry, it's on the mend.
 Here's what the hole looked like yesterday. The paint is thinset over new drywall. 
The coolest part to me? The thinset dries white so you know it's ready.
Here it is today- with 2 coats (and lots of sanding and dust on the floor). Much better. One more coat of paint and we're back in action. And look at that nice new electric outlet. And after hanging all the little crystals individually, we realized there is one small tall problem.....


 Jamie hits his head on this thing. Oh well! At least it's just the dangling part and not the metal. I am sure he will get out of changing a few diapers by saying "oh but I can't fit under that chandelier you wanted!"

Here's baby room to date. I love the cream/yellow/grey/light color theme and how soft it all looks. The curtains haven't been put back up yet because we don't want dust all over them. Same reason no bedding is on the crib. We'll get there.

I'm satisfied for today...productivity + a good bacon and cheese omelet for brunch will do that for me!
Related Posts Plugin for WordPress, Blogger...